
T'gives, 4 of 4: umami & stock.
T'gives, 4 of 4: umami & stock.
(Four was probably not the right number.)
Good morning. 🌞 Less than a week to go, but you should be sitting pretty, right about now: you’ve got your meal all mapped out, and maybe even dough for your dessert in the freezer. There’s no reason to spend your weekend going totally HAM on prep, but your time would be well-spent making a batch (or two) of homemade stock ahead of next week’s kitchen olympics: it’ll keep just fine ‘til then, and every dish it touches will be all the better for your forethought.
Before we get to the recipes today, we’re covering a bit of related science: umami, and what it is, and how to dial it way the hell up. Want to skip it? I kinda hope you don’t: whether you’re a vegetarian, a vegan, or an omnivore, there are tiny tricks in here that will noticeably increase the deliciousness of your cooking, Thursday and always, and I’m keeping it pretty brief; today’s text should only take you about 5 minutes to read. Still not feeling it? NBD - scroll right down to the recipes, instead. I’m including a couple of pie-related reader queries first, though, so don’t miss those, if you’re curious. xo. See you next week for some home-stretch sorts of things.
Reader Q’s
Question: “Any tips for tidying up my watery pie filling?” - J.S., Maui
Answer: Assuming it’s a fruit pie, try all of these things: (1) Toss your prepped fruit in sugar (the type & amount called for in your recipe) for 30-45 minutes, then strain off the juices and reduce them in a pan for 5-10 minutes before adding the strained fruit and cooking that for an additional 5-10, as described here; this helps you reduce the amount of liquid that goes into the crust while concentrating flavor. (2) Use your digital thermometer: your thickener of choice might not be getting up to temp. The thickening power of wheat flour isn’t maximized until the very center of your pie hits ~130F for 2-3 minutes; potato starch, about 160F; arrowroot and cornstarch, almost 200F. If you’re concerned about your crust burning before the center of your pie hits its target, wrap the edges with foil and/or lower the rack closer to the bottom, so the radiant heat from the oven ceiling isn’t cooking the top of the pie quite so quickly. (3) Throw some dried fruit into your recipe - 1/4 to 1/2 cup per pie; it’ll absorb the juices that the fresh fruit releases as the pie cooks. (4) Don’t slice your pie until it has completely cooled - overnight, even - because, retrogradation. // If you’ve got a custard pie that’s consistently coming out watery, you’re probably overcooking it or cooking it too quickly; the eggs are scrambling, and the tightening proteins are squeezing out water. Try using a hot water bath, getting an oven thermometer (many oven thermostats are off by 25-30F), and lowering the cook temp in the recipe by 25F while increasing the cook time by 25% or so. Also, some custard pies use a starch thickener in addition to the eggs, so see the notes above re: thickener temps.
Question: “Is there a way to make peeling & coring apples any easier?” - anonymous, via IG DM
Answer: Not really; peeling just super super sucks. It’s all in the tools, though, so maybe you could use an upgrade. If you’re using a stick peeler, get a Y peeler instead - it’s much more ergonomic, and you’ll power through the task more efficiently. Also, give up on coring tools entirely; they’re clumsy and inaccurate, they’re rarely of a wide-enough diameter to get all of the sharp pockets that encapsulate the seeds, and they waste an unnecessary amount of flesh. Instead: peel your apples (using the Y!), then slice in half lengthwise and use a melon-baller to scoop out the seeds from the center. Faster and no-waste. Slice or dice the apple halves as appropriate.
If you still hate it: same. It’s a necessary evil but an evil nonetheless. If you’re feeling feisty, though, there’s always this.
UMAMI
What is it?
“Umami” is a word of Japanese origin that roughly translates to “tasty” and refers to the taste sensation that’s best described in English as “savory.” It’s been a buzzword in food media for a decade or more, and is sometimes also described as the “flavor of satisfaction” or of “deliciousness,” and sometimes even less-appealingly as “the flavor of brown.” It’s not an ingredient; it’s a perception. It’s also commonly referred to as The Fifth Taste; Western science recognized only four basic taste sensations before umami was discovered by a Japanese researcher in 1908. Our tongue has taste receptors for salty, sour, bitter, and sweet flavors - and also has taste receptors that are triggered by an assortment of compounds (the amino acid glutamate, inosinates, guanylates; there won’t be a quiz) that register as the deeply flavorful umami. It is less specific than the other four recognized tastes, and has been recognized for less time, but it’s no less important, because when we experience it, our brain tells us that what we’re eating is intensely delicious and satisfying - and the whole point of being here* is eating delicious food. (*Whether you define “being here” as “reading this email” or “being alive on Earth” is really up to you.)
I could write a lot about umami, but I won’t (today, anyway); if you want to read more about the origins and research, there’s good stuff here, and here, and here. For today’s purposes - and with as little unnecessary science as possible, I promise - we’re just going to explore how to maximize the taste of umami in our food, and then make some crazy-delicious stock.
Academically, the concept of umami is still a little elusive; because it’s a perception, it’s largely subjective, and that makes it tough to determine definitively what is and what is not umami. What we do know, though, is that it’s largely tied to glutamic acid: where glutamic acid (or glutamate) is present, we will perceive the flavor of umami. What is less widely known - but no less true! - is that when glutamates are exposed to the compounds guanylate and/or inosinate, our perception of umami flavor is amplified - by some accounts, up to 30x.
So, TL;DR: umami is the taste of “delicious,” and we perceive and experience this umami when glutamates are present in food. And when we expose those glutamates to guanylate or inosinate, our food becomes up to 30x more delicious.
Up to 30x more delicious is - am I wrong, here? - a super big deal. And I feel as though our take on it should be pretty much this: “I don’t care what glutamates or guanylate or insonate are - I just want to know where to find them.”
I gotchu.
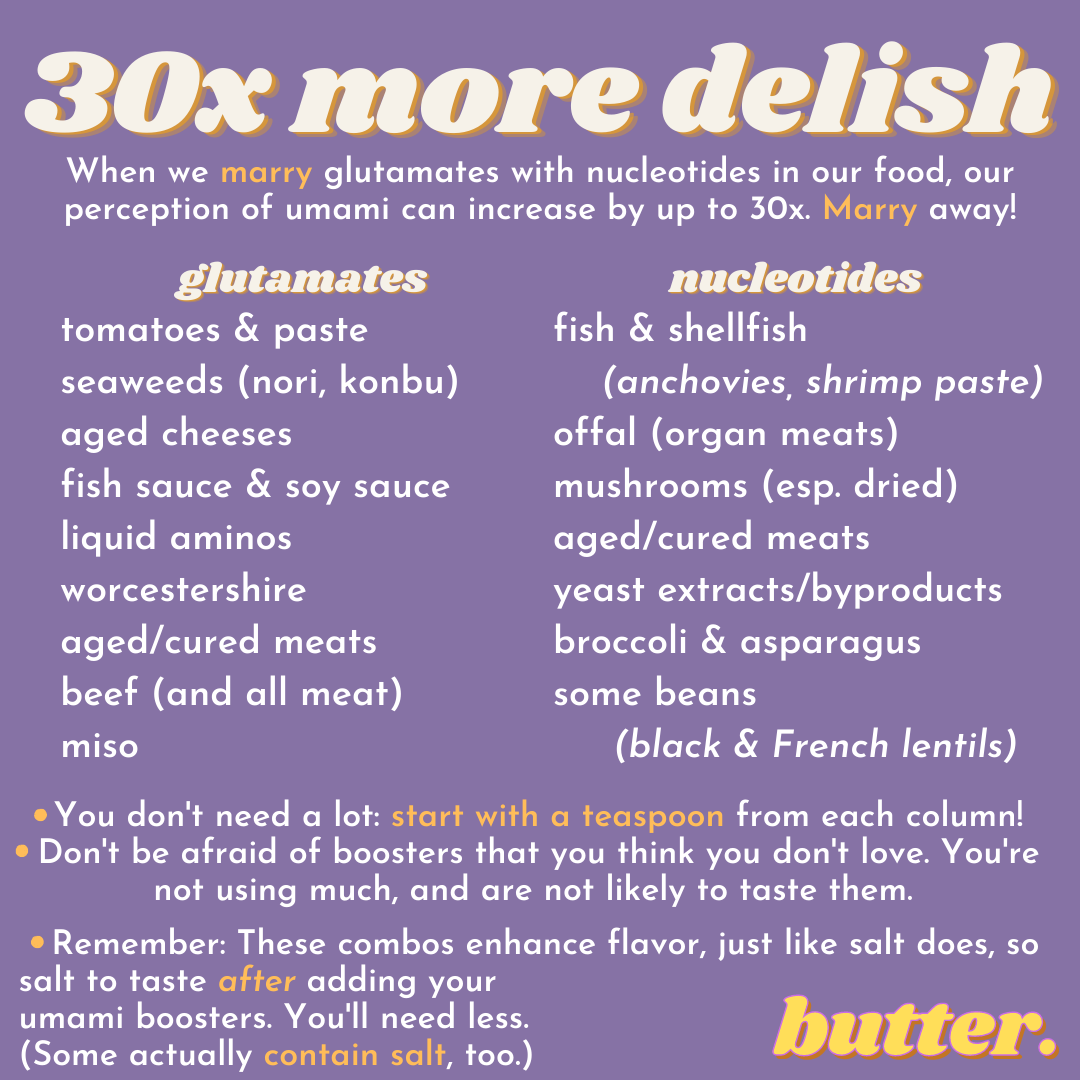
P.S. - it’s super easy to save these little graphic boxes to your phone’s photos for quick reference!
Glutamates and nucleotides (inosinate and guanylate are both “nucleotides,” and we can skip understanding what a nucleotide is for now) are both umami boosters, and while adding any one of the above ingredients to your dishes can amplify that savory delicious flavor, adding one from both columns initiates a “more than the sum of its parts” situation. And being able to exponentially increase flavor with such limited work is invaluable - even more so during a week when you’re going to be cooking your ass off.
Assuming I’ve sold you on their value (and if I haven’t: man, you’re a tough crowd), here are a few notes on incorporating these boosters into your food.
First & foremost: do not be afraid of those ingredients. A lot of them are polarizing, and that’s kind of the point: they’re intensely flavorful and loaded with palate-triggering compounds. What’s more, very few of them are fresh foods; the processes of dehydration & aging trigger the release of enzymes that break down proteins, and the result is that these compounds - glutamates and nucleotides - are more readily accessible, leading to more intense flavor. If you’re not a fan of anchovies or seaweeds or Marmite, science is on your side, here: they’re all just a lot for your palate to process. But you need very, very little of these things to benefit from their umami-boosting mega powers - a teaspoon or two per recipe. And when you use two or three boosters in a given a dish, not only will you maximize your flavor output, but you’ll also keep any one booster from dominating the flavor profile; nothing tastes fishy or cheesy or mushroomy, it just tastes good.
Some good news: because you can use so little of each of these boosters, and because most are aged and processed and shelf-stable, it’s easy to lay in a stock of six or seven that you can mix and match as appropriate. Not a fan of cheese with fish? Again, you’re using these in such small quantities that you won’t notice either flavor profile, but still, feel free to skip the pairing: if you’re making a fish dish, pass on the parm and instead add some mushroom powder and soy sauce. If you’re really looking to stock up, ethnic markets are a goldmine: you’ll find all sorts of fish sauces, fermented pastes, tomato and mushroom and seaweed powders, all for just a buck or two.
Adding them is so easy. For things like fermented spice or seafood pastes, fish or soy sauce, or powdered ingredients, you can just mix them right into whatever you’re making, or even pat them onto the outside of your protein before grilling or searing. Larger ingredients like kombu seaweed or whole mushrooms are maybe a little more daunting, but you can grate them with a Microplane, the same way you grate your Parm for pasta - or even throw them into a spice or coffee grinder. Alternatively, you can steep them in hot water, or make a stock (more on that in a bit).
You’ll notice that some things are listed under both categories (meats, for example). If you’re grilling a steak, don’t assume that because it already contains glutamates and nucleotides that you’re good to go; meat IS very good on its own, but the idea here is that by utilizing other ingredients, you’re boosting that goodness. Choose one additional booster from each category - even if the main component of your dish is, itself, a booster.
A lot of these ingredients naturally contain high levels of salt and/or are processed with additional salt. Since these booster pairs are turning up the flavor for you, and occasionally bringing some of their own salt to the party, as well, you’ll want to save your salt-to-taste step until the very end of your cooking process - you’ll use way less than you usually do.
If you’re wondering how to put this new flavor formula to work ASAP (by which I mean: on Thanksgiving), here’s a handful of things you could try:
Whisk a tablespoon each of soy sauce and nutritional yeast into your gravy recipe.
Roast the turkey liver with the bird (or just pan-fry it in butter on its own), then mince it and add it to your stuffing along with a teaspoon or two of Worcestershire sauce.
Steep a parmesan rind and a few dried mushrooms in some warm heavy cream and then use it in your mashed potatoes - they won’t taste cheesy OR ‘shroomy, just deeply savory.
Steep a piece of kombu in a cup of hot water and use it to deglaze your pan of Brussels sprouts with pancetta - it’ll add oomph to the funky pork.
Add a tablespoon of nutritional yeast or an anchovy filet to your sauce for mac and cheese (and don’t forget to use at least a little aged cheese in there, too).
Use a cup or two of one of the stocks below, which do the work of combining a lot of the good stuff for you; you can add them to stuffing, gravy, mashes, veggies, pasta, or even simply simmer two cups of it until reduced by half, and then pour it over your warm slices of turkey for moisture and intense flavor. xo.
Best-Ever Poultry Stock
Don’t use this method or this ratio of ingredients for beef, pork, or seafood stocks, but do feel free to use any combination of poultry bones & meat that you’d like. One must: you’ve gotta use bones AND meat, and it must be roasted to hell & back. No raw chickens. If you don’t want to take the time to roast: cheat & buy a rotisserie chicky. You could do worse.
Ingredients
about 4 pounds of bone-in chicken or turkey
1 T each olive oil and kosher salt, plus 1 tsp of brown sugar
8oz mixed mushrooms (I use shiitake & baby portos), with stems
one whole head of garlic, sliced crosswise
one onion, quartered, skin on
1/4 large or 1/2 small bunch of celery, heart & leaves included
5-6 stems fresh thyme
1 tablespoon each: soy sauce, miso paste, nutritional yeast
Rub poultry pieces with olive oil, salt, and sugar, and arrange on a rimmed baking sheet (no parchment or foil). Place on center rack and set oven to 400F (no need to preheat; you’re not going for texture, here). Roast, checking occasionally and turning over the pieces as needed, for 1-1.5 hours until deeply bronzed. Add mushrooms to the pan, roast for 5-10 additional minutes, then remove from the oven.
Place roasted poultry and mushrooms into a deep stockpot OR the belly of an InstantPot. Add all remaining ingredients, breaking things up as needed to get it all to fit, and pour over 2.5 quarts of water.
Pour 1 cup of warm water into the now-empty sheet pan and carefully scrape up all of the brown delicious bits that the meat left behind. Once you’ve gotten it all up, carefully pour this majestic liquid into your stock pot.
Cook: if you’re InstantPot’ing it, set it to 90 minutes and just let it go. If you’re just using a pot on your stove, bring it up to a rolling boil, then lower to a bare simmer and maintain that for 4-6 hours, adding water as needed to maintain volume. (Stovetop method works better with a double batch, left to cook overnight, if you can stomach it.)
When you’re done, use tongs or a spider to lift out the large pieces and discard them. Carefully strain the remaining stock and any errant little bits through a fine mesh or piece of cheesecloth into a clean pot, then transfer to smaller containers and place in the fridge. Remove the fat cap once solidified (you can save it - schmaltz!) and then store for a week or freeze indefinitely.
No carrots, no black pepper. Rules are rules, man. (I’m kidding.) Do it if you want, but I find that even a lone carrot makes things too sweet for my liking, and I’d rather add fresh black pepper to finished dishes.
Double the recipe if using your Thanksgiving turkey carcass! And I hope you do.
Umami-Bomb Stock - Veg(an)
This is commonly called “umami-bomb” stock because - it is. It’s insanely flavorful, and a great tool to keep in your fridge or freezer (freeze it in little 1/4 cup cubes so you can pull out only as much as you need). There are a lot of ingredients here, and if you need to leave out one or two: that’s ok. To that end: leave out the cheese rinds and it’s vegan. This is saltier and more intensely flavorful than the poultry stock - it’s almost a bouillon - so if you’re using it to cook something that reduces the stocm in volume significantly (risotto, for example), you’ll want to dilute the stock a bit first, or alternate adding stock and water to the dish. For vegetables, pastas, sauces, bread dishes, and soups, though, you can use it just as it is.
Ingredients
1 head of garlic, sliced crosswise
1 onion, quartered, skin on
1/2 small or 1/4 large head of celery, heart and leaves included
2T soy sauce
2T miso
8oz mushrooms, with stems
1/4 cup of oil-cured olives
1/4 cup of black or French/de Puy lentils
1-2oz piece of kombu
1 tablespoon of nutritional yeast
2 cloves or (2 tsp dried) fermented black garlic
1 T tomato paste (optional; very flavorful but it makes it definitely “tomato”)
100g of aged cheese rind (omit for vegan)
This one’s easy: just place everything in the pot or InstantPot, add 2.5 quarts of water, and either stove-top simmer for 2-3 hours or IP process for 45 minutes.
When you’re done, use tongs or a spider to lift out the large pieces and discard them. Carefully strain the remaining stock and any errant little bits through a fine mesh or piece of cheesecloth into a clean pot, then transfer to smaller containers and place in the fridge. Once chilled, there may be a small fat cap; if so, scrape it up and discard. This one only lasts 3-4 days in the fridge but can be frozen indefinitely - again, it’s so great to freeze it in tiny cubes that can easily be added to anything.